

Metal tooling, also called “repousse” and “metal embossing” is a type of low-relief sculpture in which tools are used to create a design on metal.
This centuries old practice can be found in artworks including armor plates from ancient Greece, King Tut’s mask, and Mexican tin art designs.
Gold and silver were used for more detailed works while copper and bronze were more suited to large sculptures and armor.
All of these designs were heavily laden with visual texture.
Ancient civilizations created these metalworks for functional purposes like protection and utilitarian uses. More advanced cultures relied on the decorative nature of metal embossing for religious purposes.
In both instances, metal tooling art lends itself to creating visual textures and repetitive patterns on the surface of the metal.
Visual texture is an implied texture you can see like cloudy, shiny, and windy and can be drawn as such.
However, tactile texture can be touched to understand how they feel like bumpy, fuzzy, and smooth.
In this lesson, 4th grade students create a metal tooling design using five unique visual textures.
And they arrange their elements in either a static or dynamic composition.
As a result, their design has movement or not.
Metal Tooling Materials
- 36 gauge aluminum tooling foil
- Embossing stylus tool, wooden sticks, or clay tools
- Masking tape
- 6″ square paper
- Pencils
- Colored permanent markers
Visual Texture and Composition
First, we brainstorm various textures in our sketchbooks. We look for examples in the classroom and draw them. I project pictures from everyday life on my smartboard for ideas, too. Then we quickly classify them as either tactile or visual.
Next, I give a brief lesson about dynamic versus static composition.
I show them examples of each in works of art. I like to say that a static composition reminds me of stamps in a stamp book. They’re all sitting next to one another in an orderly fashion; my eyes have to hop from one to the next.
In contrast, a dynamic composition would be if I threw all those stamps up in the air and snapped a picture of them simultaneously; my eye continually moves from one element to the next without repetitive shapes blocking the flow.
Neither compositional style is better than the other, just different.
I want them to reflect on what they’re trying to communicate, then pick a style that best matches the selection of textures they’ve chosen.
Windy, wavy, jagged, swirly, scalloped. These all feel quite active (dynamic).
However, sandy, bumpy, and scaly feel passive (static).
Metal Tooling Art Lesson
Once they understand the two styles, I have them select five visual textures for their metal tooling project.
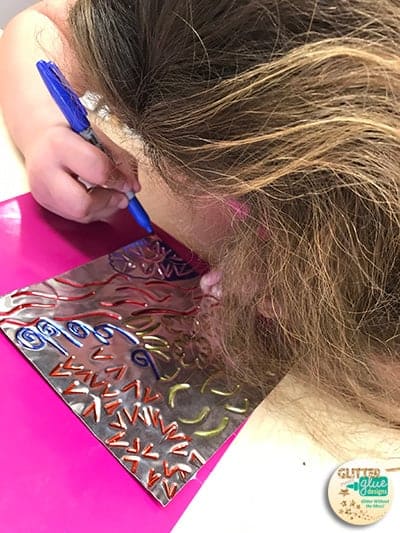
First they begin laying out their idea on a 6″ square sheet of copy paper. After the design is approved, they tape it to a sheet of 6″ square metal and trace over their lines with a wooden stylus or a thick pencil. While some metal tooling requires a slightly softened but sturdy surface underneath, this project does not. Students use a padded surface underneath so their marks are softened and thick. A short stack of paper or a piece of foam works fine.

After the first pass is completed, they pull the paper and tape off and go over their lines a second time pushing harder. This will deepen the lines, making them easier to color.
By and large, most students have no problem with the second pass. They make their marks deep enough. For those who don’t, I let them test out it out on a scrap piece of metal. This reduces their fear of pushing too hard.
I also have some that push too hard. When this happens, I show them they can flip it to the back and close the gap with their embossing tool.
In some instances, students will create visual textures that are made with shapes. If this is the case, I show them how they can “pop up” the shapes by pressing harder and “coloring in” the shapes from the backside.
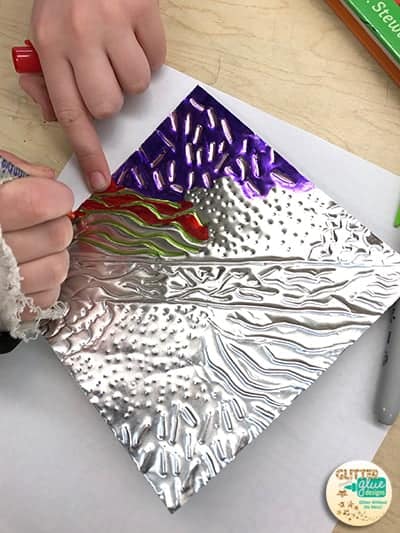
To complete the design, they use permanent marker to color beginning with any lines that are pushed in. Lastly, students color the background a different color for emphasis.
Student Examples
This is one of those projects that my students love. It’s their first time creating with metal. And they get so enamored with the idea that they can make marks in metal. Most of all, using permanent marker on top is icing on the cake.


 Blog Hop
 Blog Hop
Some of my other art teacher friends have joined me in a blog hop. Click on over to see some great ideas to inspire your next art lesson. Each teacher has written about a topic that in some way connects to the next one.
- Bird Sculptures Using Tactile Texture, by Art is Basic
- Dyed and Stamped Pillows, by Masterpiece Momma
- Relief Printmaking and Colored Pencil, by Look Between the Lines
- Mixed Media Hometown Scenes, by Expressive Monkey
- Zen Doodle Pinch Pots, by Ms Artastic
- Henna Hands Art Lesson, by Picassa’s Palette
- Past and Future Hands, by A Space to Create Art
Did you like this art lesson? Share it with others on Pinterest!


Hi, absolutely fantastic work. What pens did you use?
Hi, they’re not pens. They’re wooden styluses.
Love this project! What do you use to cut the sheet of metal?
Scissors or a paper cutter.
Thank you so much. I have been searching for a thorough lesson plan on metal working with students. What grade level do you do this with?
Thanks, Rebecca
4th grade.
Love this project! Once they’ve created their design on a sheet of copy paper, you just had them lay that paper on top of the foil and trace over their design with a tool to create the texture on the foil?
Hey Anna, yes. They used two small pieces of masking tape to keep it in place.
The 36 gauge is just a normal aluminum so you can find it just about everywhere.
That would depend on where you are. I’ve never found it in an art or craft store in my metropolitan area.
I’m having a hard time finding this metal at the gauge stated on this site. Information on where to purchase this would be greatly appreciated. Thank you. The art pieces came out beautifully. Eve
Hi Eve, check out School Specialty. They sell this brand in different lengths. So do a search for it on their site. or just search the word “foil” and you’ll see a little over a page worth of products that will show the different lengths. I cut them to 6″ x 6″ for each student. Do the math on how many sheets you’d need and how much you can get out of a roll to figure out which roll length would be best suited for your needs: https://www.schoolspecialty.com/st-louis-crafts-36-gauge-aluminum-metal-foil-roll-12-inches-x-50-feet-567280
I am currently working on this project with my 4th graders! Thank you for your informative article and student examples… my kids were really inspired and are super excited to get started themselves!
Thanks for letting me know, Amber! If you’re on IG, tag me in any pictures you upload. Would love to see them!
What grade did you do this with?
Hi Kendra, I do this with 4th grade but I work at a Title 1 school. I have a lot of IEP students. You could certainly try this with 3rd grade otherwise.
I am not a teacher but would love to incorporate this design technique to embelish some features in my home. Where can I obtain the 36 gauge aluminum foil? Could you show a picture of the metal tools the kids were using?
This is just “WOW”!!!!
I will be happy to write a blog post about metal embossing. Thanks for the idea! We buy our supplies from Blick Materials.
Did you glue them to the colored background or staple them?
Hi James! I actually taped them on with masking tape.
WOW there are some gorgeous results from this tooling project! I think you’ve really been making an “IMPRESSION” on them since their work reflects the style of some famous artists! Sorry, I couldn’t resist the pun!
Also, I really love your analogy for static vs. dynamic! What a great lesson!
Gorgeous project! I really enjoyed looking at the variety of textures and patterns and the way students incorporated color. Thanks for sharing this lesson idea!
Gorgeous project! I really enjoyed looking at the variety of textures and patterns and the way students incorporated color. Thanks for sharing this lesson idea!
These are beautiful! I love how unique each one is.
Such a beautiful art project! I love how they connected to other art works and imagery within their own pieces! I totally want to try this one in my classroom! Thank you for sharing!