

Artist trading cards are like bite-sized foods, itty bitty kitties, and mini horses. They’re all things people are obsessed with.
And big things, too, of course. Think: oversized art supplies. For the longest time, I designed art lessons on standard sized paper. However, after I read about other art teachers creating mini artworks, I knew I had to bring this artist trading cards lesson (ATCs) to my art room.
ATCs are 2.5″ x 3.5″ in size and can be designed with any materials. Their small size makes them an ideal fit for clear, plastic trading card sleeves. Now that you know what one is, let’s dive into how I set up the lesson.
Artist Trading Cards Setup
I allow my students to use a wide variety of art materials for their artist trading cards: painted paper, graph paper, construction paper, fabric, jewels, gems, pom-poms, pipe cleaners, yarn and whatever else is laying around.
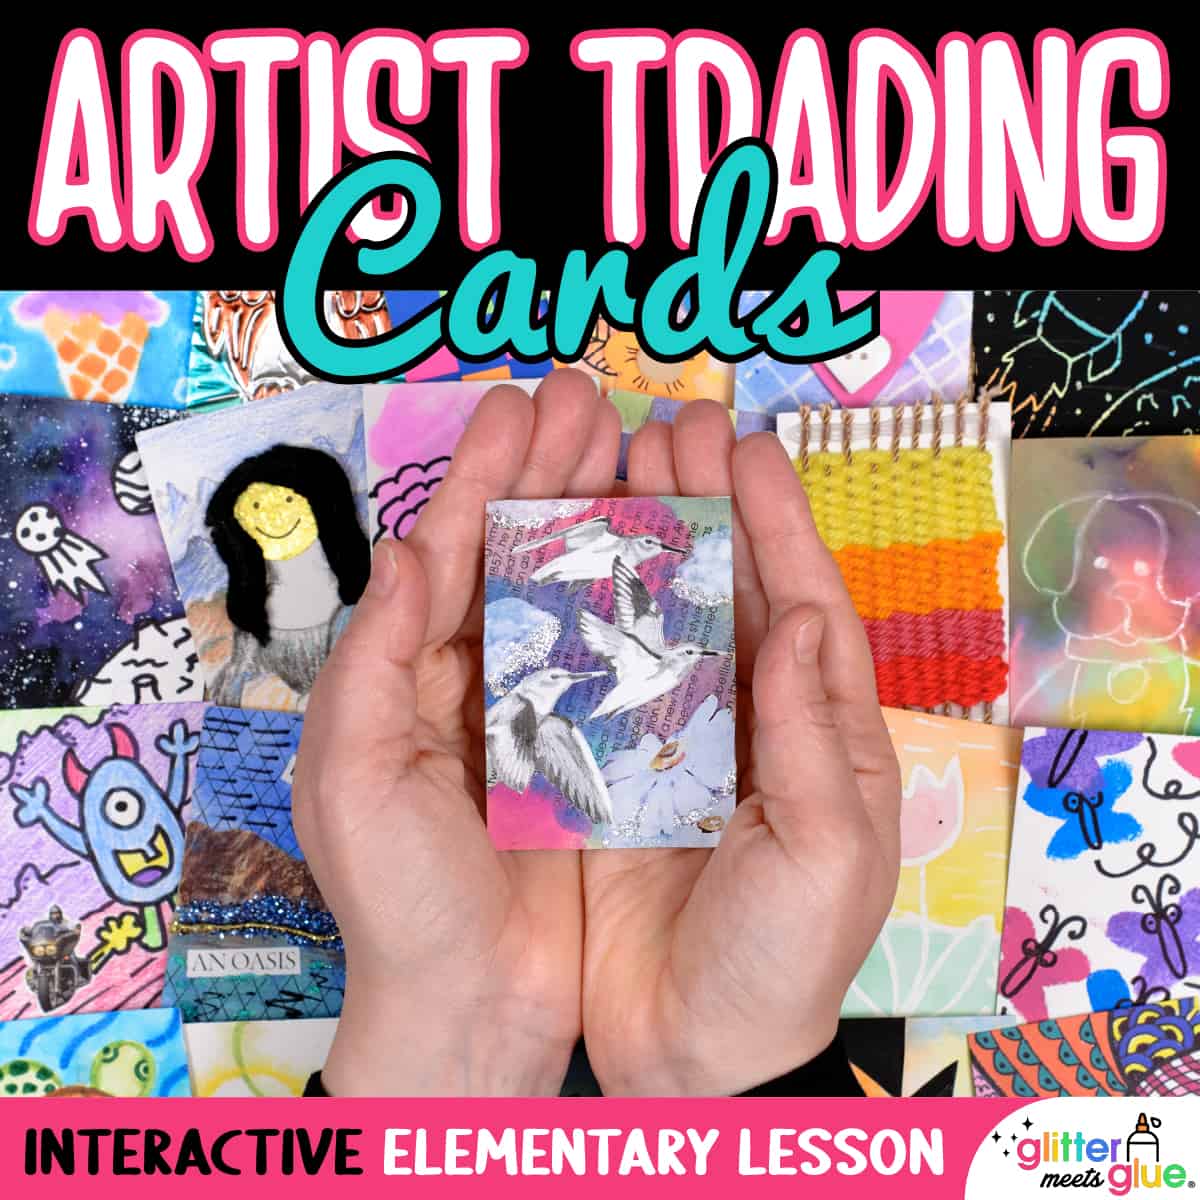
Also, they have access to paint and metal foil, as well as dry materials like markers, colored pencils, and crayons. Some students even bring in bits of things laying around their house!
Here’s a break down of the setup.
 Bowls of Goodness
 Bowls of Goodness
First, every table gets a large plastic bowl of goodness otherwise known as “The Bowl of Goodness.“
That’s what I call it.
That’s how I market the leftovers to kids.
Yes, market!
And they buy right into it.
Because listen teacher friends, we all know we have to peddle those scraps into other projects. Our budget needs to stretch to balance out more expensive projects throughout the grade levels.
And #realtalk: it’s hard to breath new life into cut up bits of paper, ribbon, foam shapes, and magazines. (((But this is how you do it.)))
Anyways, I keep all the scraps in a large plastic bag in my closet and assemble the bowls prior to the artist trading cards lesson.
Now, have you ever been to the beach and seen when the ocean gets so churned up that all the shells, seaweed, and bits of jellyfish wash up in one giant, mangled nest? Yeah, that’s what the scraps look like swimming around in that bag. The kids will love it all the same, though. PROMISE.
Then before the lesson starts, I like to add new scraps to the bowl so one class doesn’t get “all the good stuff.” I pre-cut scraps and sprinkle each bowl with fresh “goodness” before the lesson.
Miscellaneous Materials
 Miscellaneous Materials
Next up is paint. I stack tempera cakes by the sink for whoever wants to paint. The brushes and water containers are right there so they know to help themselves. It’s a fairly flawless system.
I allow my 4th and 5th graders to have access to the most amount of materials which includes paint. They’re used to tempera cakes and know how to clean up (sorta).
I’m more stringent with 2nd and 3rd grade. I don’t give them tempera cakes right away. We do a bunch of lessons before that happens. And I don’t use them at all with kindergarten and 1st grade. Those grades focus on collage to practice cutting and gluing skills.
The same can be said for metal foil. I don’t introduce it until 4th grade. 5th grade has access to it and 4th grade does half way into the year.
I also provide colored permanent markers so they can color their design. The foil is cut to size in advance of the lesson but I have them glue the foil to an ATC card for stability.
Everything else is self-serve in my room. I have a cart in the front that has markers, crayons, colored pencils and even ink dabbers. The students help themselves. But they’re also expected to clean up after themselves.
Cards
 Cards
CardsI take bristol board, white oaktag, or heavyweight sulphite paper (whatever is available) and cut it down to 2.5″ x 3.5″ cards. I buy a ream of 24″ x 36″ paper for just this occasion. One large sheet is enough for one class of 24 students.
And I cut a mountain of cards in preparation for this artist trading cards lesson.
During the lesson, I prefer the slow drip method of passing out cards. Each kid gets one card at a time. I control the stack of cards and don’t hand one out until I see their completed work from the previous card.
Friends, trust me on this. All that cutting and kids will burn through those cards gluing one picture to the entire background of the card. That’s it. And you will be annoyed.
As for taking ownership of their work, students write their first name and last initial on the card. If they trade cards with kids from another school or town, there is some anonymity in not putting their whole name on the back.
Creation Time
What I love about creating artist trading cards with students is that they really get into it. The structure of the lesson is loose. It’s like, here are some materials, create what you like (sometimes I provide limitations). But be mindful of your techniques and reflective of the content.
I often spend the time walking around the room, learning about what each artist is creating and why. I’m searching for those pockets of inspiration and figuring out ways to get them to push the bounds. There’s nothing more exciting than being the guide on the side.
A perfect example was a boy I had named Jake. During the first lesson, he painted Stella, a character he designed and crafted himself. In wanting him to push the envelope, I encouraged him to design a Stella series from different materials. Jake’s work was amazing and very well-sought at the end of the year artist trading card swap.
Artist Trading Cards Storage
 Artist Trading Cards Storage
First, every student is given a plastic sandwich bag with their name written on a piece of tape. One bag, that’s it. You break it, you bought it.
Then all the bags from one class are put into a gallon-sized plastic bag that’s color coordinated based on their grade level and has their teacher’s name on it.
Lastly, all of the grade level bags are stored together for easy access.
At the end of every lesson, all the dry cards are put in their baggies while the wet ones are put on the drying rack. Once dry, I throw them into the class bag and let the kids find theirs at the beginning of the next artist trading cards lesson.
I thought rubber banding them together would be OK but that turned out to be a nightmare. Pieces of their designs fell off. And I learned how difficult wrapping a rubber band around some cards could be for some. Best to be avoided.
ATC Swaps
The whole purpose of making artist trading cards is to swap them. You can swap within one class, with multiple classes in one grade level, with various grade levels, and even different schools. Nic Hahn of Mini Matisse does a yearly swap signup if you want to trade with other school, you should jump on that!
I’ve run my swaps at the end of the school year when we have the most amount of cards to trade. It makes for an awesome last day of art lesson. The kids are uber involved in swapping and there’s no messy cleanup.
Artist Trading Cards Swap Guidelines
 Artist Trading Cards Swap Guidelines
I came up with some on-the-spot guidelines for swaps:
- Trade one-for-one or one-for-two.
- Shake on it!
- No forced trades.
- “No thanks, I’ll pass.”
- Trade-ups are allowed.
A little explanation about the rules…
First, I feared some kids would be taken advantage of and feel forced to trade fifteen cards for one. So I limited the number of cards they could trade for (in my presence anyway).
Secondly, I was concerned that kids would swap and then claim it wasn’t ‘legal.’ Therefore, I instituted the “shake on it” rule so it was clear to both parties.
I also worried that there would be hard feelings if a student chose not to swap cards with someone else. We discussed how it was important to kindly turn down their peers, so “no thanks, I’ll pass” was implemented.

To counteract some of this, I suggested my students put aside one or two cards that were too personal to swap.
For example, if they made a card in the likeness of a family member. Or they spent a great deal of time on a card and fell in love with it. And if a student didn’t want to trade cards, I asked them to use the time to share their cards with others and see what their peers created.
And lastly, so as to avoid confusion, I allowed students to trade the cards they traded for because their cards are a currency just like in real life.
Assessment
All of this begs the question, “How do you assess all of your students artist trading cards?” When it comes to assessment, each teacher is different. Some teachers aren’t even required to give grades. Others like myself need to constantly provide a grade to parents. So to answer the question, I grade each card like it’s a piece of artwork for any other lesson.
The good news is that if you do the same, you’ll likely have a large pile of grades in your grade book. The bad news is that it’ll be a ton of work.

Depending on how many cards your students create, you can elect to assess the best three of five, or six of nine, or something of that nature.
Plus, many students will have works in progress when you’re ready to move on to something else. Those cards I don’t grade immediately. Quality over quantity is the key.
Conclusion
If you’re looking to infuse student choice into your art lessons, this is how you do it. Your students will love the opportunity to express themselves in a way that interests them. And you’ll love all the independent choices they’ll learn to make in a structured environment.
In future posts, I’ll talk about how I pack a lot of content into a series of artist trading card lessons, content I would have otherwise not gotten to in the school year based on time.
I’ll also touch upon various techniques that I focus on as well as ones student’s have devised on their own.
Do you have an questions about how I set up and run this lesson? Leave a comment below and I’ll get back to you.


Hello, I am a portuguese art teacher, I simply adore your page!
I teach from 7th to 9th grade this year. Mix media, collage, painting..
I would like to trade with other schools.
We have several themes (for now it´s “cats and dogs”, Halloweeen, Christmas, Bees)
Bees is our anual theme, for 2024/2025.
How can I get in touch with other teachers to trade Kids cards?
Thank you
Hey Alice, I recommend trying to connect with other art teachers in Facebook groups. Try this one. Be sure to respond to all the questions to get in: https://www.facebook.com/groups/352821833725843
This is awesome! What time of the year to you introduce this? What grade levels work on these? Thank you!
Hey Theo, I like to introduce these during the middle of the first marking period, once routines are established and we’ve done at least one project. It’s the natural time to start them because you’ll have some kids who finish on time and others who need more time. And they work with all grade levels. But I put a heavier emphasis on the older grades to do them as early finisher activities and the younger ones as mini class projects and center activities (in other words, not as early finisher activities but as whole group or small group instruction). They need to develop a level of expectation I have in place for them. Because if you don’t do that, you’ll find them approaching you every 5 minutes for a new card. And you’ll burn through them quickly. Hope that helps!
How do you handle it if no one wants to trade with someone?
Do you have any specific guidelines for each card regarding craftsmanship or coloring, etc?
Hey Shelly, I’ve done this with K-5. I’ve never had an entire class not want to trade. Individual students, yes. Not a whole class. They like trading with their friends. 🙂 I use the same concepts across the grade levels to assess them: media skills, creativity, following directions, work habits, etc. With that said, it’s important to give them some autonomy as this is a lot of them developing as an artist. (https://glittermeetsglue.com/product/editable-art-rubric-for-elementary-middle-school/)
I love ATC’s! I run trading card workshops in the evenings (in my home studio) for families – complete with pizza, drink, and dessert. Typically I have a theme (magazine collage, rubber stamps, paint, zentangle, a specific artist, roll-a-design with dice, quilling, Lego figures, etc) so that I can control the chaos. I start with a short introduction to the theme and talk about the materials that are displayed in the room. It’s fascinating to see what the diversity in age/experience/background creates. I always recommend that participants create a duplicate of a card they like for our “blind swap”. Each card is marked on the back with Name, Title, Date, Town/State, Age (optional). At the end of the night (2 hours) each person can decide if they want to participate in the swap and the chosen cards are placed in the basket that I bring to the swappers – they raise their hand high, reach into the basket and pull a card to add to their collection. While this is happening all the completed cards are displayed and discussed and oohed-and-aahed over. Swapped cards are received and the receiver must thank the artist (good for kids interacting with adults).
I love the idea of trading at the end of the month or season or year – a real trade that I have avoided because of the variability in our art. We use trading card pages (those that are used for baseball cards) in prong folders. Many years later it is exciting for us to look at the art that we swapped, the friends that we don’t see anymore, and the growth in our work.
Oh wow, that sounds like a whole lot of fun for all involved! I love all the themes you’ve outlined, too. They’re great ideas for anyone listening in here. Thanks for sharing!
This is so wonderful to see! As an adult who has traded for last 15 years and over 3000 cards, they have become little art treasures!
Thank you for sharing
ANg
Love this idea! Excited to find out how you pack in all that content. Also, how many days and/or how often do you do this?
Hey Jill, so I go about ATCs a couple different ways. If a kid finishes a project early, they can make cards. I always have cards, bowls of goodness, and basic materials at the ready. So there’s no real setup involved or content to pack in. It’s all self-guided. Then there are the days where I schedule an “ATC Day.” If 5th grade just completed a big project, I give them the creative freedom to make ATCs. It’s the closest I come to TAB in my art room as I think a range of projects and opportunities on the choice spectrum makes for happy students (and teachers). Over the last couple years, I’ve found that I’ve done more ATC lessons than the year before, converting older lessons to apply to it so kids have a lot of cards in June. For example, I always enjoyed doing a metal embossing project with 4th grade. Now I give them each two metal sheets that are ATC size and we do a similar project with them. Once they have the experience of using the metal, that’s another material they can use in their ATCs from that point on. I hope this answers your questions but if you have additional ones, feel free to ask. ~Amie