Whether you’re an art teacher graduate or a general ed teacher transitioning into art, you’re likely in need of some helpful art room organization tips and tricks. Because that room isn’t going to organize itself, right? (sigh) Setting up an art room is a lot of (thankless) work.

Chances are you either walked into a completely bare room or an apocalyptic nightmare. And, you don’t know where to begin. I’ve been through both experiences. I’ll take the former over the later any day!
Setting up an art room can be an exciting, yet daunting task for brand new elementary and middle school art teachers. With all the art supplies, materials, and projects to manage, it’s essential to have a well-organized space that fosters creativity and maximizes efficiency. I’d like to share 14 helpful tips and tricks to assist you in organizing your art room.
Quick Links
- Plan Your Art Room Layout
- Art Supply Organization
- Prepping Class Project Folders
- Recycled Containers Make for Cheap Storage Solutions
- Hoard Resealable Bags!
- Baskets & Bins
- Bulk Up With Laundry Baskets
- Oversized Paper Storage
- Storage Hack: Paper Box Shelves
- Plastic Bowls Are Great for Art Room Organization!
- Rolling Carts Are Your Friend
- Storing Art Posters
- Free Space Is Not Just For Bingo
- Google Drive
14 Helpful Art Room Organization Ideas
If you walked into a room with piles for miles, your first thought might be to start throwing things away. And while I’m a huge fan of tidying up, I recommend you know what you’re throwing away before you actually junk it. Every summer the art teacher Facebook groups fill up with, “What’s this?” posts asking for help identifying tools and materials.
Instead of junking things, take note of what you have:
- Desks or tables
- Chairs or stools
- A sink or no sink (boo!)
- Closets and/or cabinets
- Drawers for storage
- Specialty furniture
- Bulletin boards
- Markerboard
- Technology
1. Plan Your Art Room Layout

Before diving into classroom decor or organizing your art room, take some time to plan your space effectively. Consider:
- Layout
- Flow
- Accessibility of tools and materials
This will help you create a functional and engaging environment for your students.
Ask yourself:
- What area(s) in the art room will I teach from?
- Do I have access to outlets in these areas for my laptop, desktop computer, and/or projector?
- Is there space for a carpet for lower elementary to sit on the floor for lessons?
- How can I position my work tables so students can be successful?
Sketch out your potential layout before you start moving any furniture. This will help with an potential pitfalls.
Next, begin unpacking any newly shipped art materials and place them on tables near where you intend on storing them. Then, pull everything out of any cabinets or closets to sort them. And lastly, get everything back on shelves and in cabinets.
At this point, if you find dried up paint bottles or damaged art supplies, go ahead and junk them. Chances are you’ll come across some things you’re not quite sure what they are. Resist the urge to toss them! Find out what they are first.
Setting Up An Art Room Starts With Seating Arrangements
Arranging tables or desks in a way that encourages collaboration and interaction among students is key. It also makes sharing art materials easier.
Also, think about how students will enter and exit the room.
- Is there enough space to accommodate a line?
- Can students move freely between desks, especially when all the chairs are occupied?
- Is there enough room to accommodate students lined up at the sink?

When I eventually received new tables and stools, walking around the art room was much easier. Ditch the chairs for stools, if you can get admin to go along.

Art Teacher’s Desk
Lately the trend is to ditch the teacher desk. But I feel it’s important to have a safe space for important documents. IEPs, 504 plans, and other written communication from the office needs to be kept away from students. I keep these things in the bottom drawer of my desk. Dedicate an area for your desk, where you can manage paperwork, stash toiletries like deodorant (this job is taxing on the body!), and plan lessons.

Paper Cutter Location
If you’re fortunate to have a paper cutter in your own room, planning its location is important. That’s because little children are curious creatures who are drawn to the handle like magnets to metal.
The size of my small art room makes it difficult to put the paper cutter in a spot completely away from students. So I have it near the sink area where I can keep an eye on it.
SAFETY TIP: When you have littles in the room, throwing a pile of stuff on top of the paper cutter is a great way to diffuse its existence. In addition, I make it a point to never use it when they’re in the room. The sound of raising the blade attracts their attention.

Construction Paper Organizer
As you decide where to place your paper cutter, be sure to leave room for construction paper within arms reach. This wooden holder fits 9×12″ and 12×18″ construction paper. Here are some cheap alternatives if you don’t have it in your budget to buy a pre-made paper holder:
- Plastic Magazine Holders: Use magazine holders to store construction paper vertically. You can buy them cheaply at most office supply stores.
- Plastic Paper Trays: Stacking paper trays or shelves with adjustable dividers will store paper easily and cheaply.
- Cardboard Mailbox Holder: These are cheap and come in various sizes. Just be mindful that they will sag with too much weight added to them.
- DIY Wooden paper Organizer: If you or friend is super handy with tools, try building your own! The benefit here is it’ll last forever.

Drying Rack Location
As you plan your space, think about a logical place for drying racks:
- Where will students travel to drop off wet artwork?
- What obstacles will be in their path along the way?
- Can they reach the racks?
- Will you load them yourself?
Some racks are wall-mounted and others are freestanding. I have both kinds. I store the portable one on top of a short bookshelf. When kindergarten, first, and second graders are in the art room, I put the portable rack on the floor, if need be. 5th grade and up can definitely reach these higher, wall-mounted ones. So those are reserved for them.

2. Art Supply Organization
One of the essential aspects of art room organization is keeping your art supplies in order. Here are some ideas to help you keep your materials easily accessible and well-managed:
Wet and Dry Storage
Ideally, you should have separate storage for both wet and dry art materials.
Materials such as paint, glue, India ink, and printmaking inks should be near your sink area. I have several cabinets below my sink area for large gallons of paint and glue. But I also have an open bookshelf to organize smaller paint bottles, watercolors, tempera cake paints, and other paint-related supplies. It’s located directly behind my sink. What I love about this arrangement is that I, or some of my older students, can quickly grab and go.

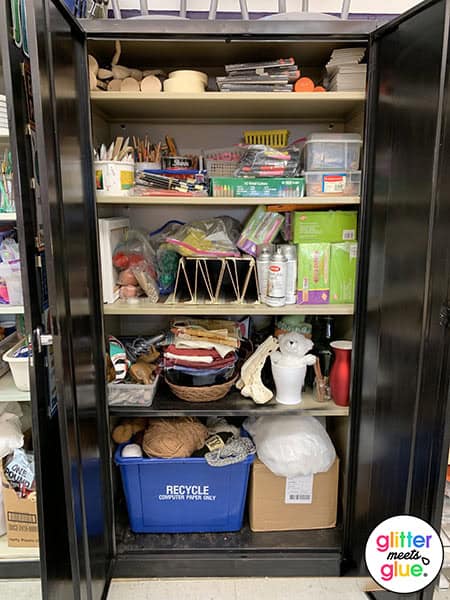
Conversely, I save my storage cabinets and classroom closet for dry materials like felt, drawing materials, yarn, fabric, beads, ribbon, etc.
Storing Sharps and Spray Cans in the Art Room
Store all spray cans and sharp tools, such as cutting blades or carving tools, in a designated locked cabinet. This ensures that access to these tools is limited to authorized individuals only, such as yourself or older students under strict supervision. The cabinet above stores all of these items because it’s the only cabinet in the room that locks. Prioritize securing these items.

And remember, when you’re absent, you never know who will be in your room. Or what they’ll be rummaging through. Or if they’ll let kids go through your cabinets on their own without permission in search of soft pastels and fill your room with clouds of dust (true story!). So secure and lock them up!
Organizing Frequently Used Art Materials
Markers, crayons, extra glue sticks, colored pencils, and rulers are just some basic art supplies students can grab freely. I sort these supplies into separate drawers in this nifty rolling cart. Consider using labels to make it easier for students to find what they need.

Art Supply Caddies
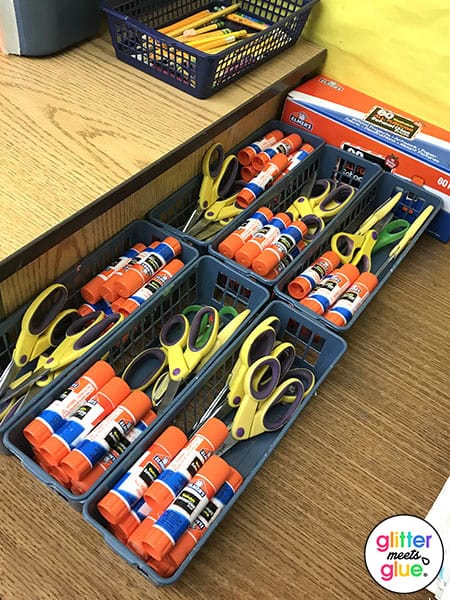
I use caddies or small containers to hold scissors, glue sticks, and other frequently used supplies. This way, students can easily transport them to their workstations and return them afterward.
For my kindergarten students who like to touch everything, I use these pencil containers as mini art caddies. The idea here is to limit what you give them so they don’t wind up getting distracted by too many tools and materials.

However, 1st grade and up use these lovely rainbow colored art supply caddies. Each is color-coordinated with one of the 6 tables in my art room. In these, I put scissors, glue sticks, pencils, markers, etc. Just the basics of what they need. This reduces the need for kids to be up and down all period long.

3. Prepping Class Project Folders
To manage student artwork efficiently, I make construction paper folders for each class. Each grade level is a different color beginning with red for kindergarten, orange for first grade, and so on. Color-coordinating everything makes filing and retrieval easier! And it saves my sanity.

This will help you keep their projects organized and provide a system for easy distribution and collection. Label each folder with the homeroom teacher’s name (or number). And keep them in an open, designated area. If you’re ever absent, you want a substitute to find them easily.

4. Recycled Containers Make for Cheap Storage Solutions
Recycled plastic or glass containers are an excellent resource for art room organization. They are often sturdy, freely available, and can be repurposed in various ways. Here are a few ideas:
- Plastic jars and containers can store small art supplies like buttons, beads, sequins, brushes, or pipettes.
- Tin cans can be covered and transformed into pencil holders or sewing needle containers.
- Cardboard boxes can be used to store and organize paper, magazines, yarn or cardboard tubes.
- Old flower vases are perfect for storing long-handled brushes.

5. Hoard Resealable Bags!
Resealable bags are versatile and practical for art supply storage. They keep small items organized and prevent them from getting lost. Consider using them for items like googly eyes, pom-poms, or small beads.
Additionally, I’m not a fan of keeping the cardboard boxes that art supplies come in. They get beat up easily and not worth the effort. Ditch ’em!
Instead, I use the gallon size bags to contain colored pencils and markers and the sandwich size for crayons. Then, those get stored in my rolling cart, so students can help themselves. At clean-up time, they can just throw them back in the bag. No need to perfectly arrange crayons on rainbow order. No one has time for that!

Also, when you’re doing a project with really small pieces, the sandwich sized bags are great to have on hand.

6. Baskets and Bins
Baskets and bins are lifesavers for art room organization. They come in various sizes and are perfect for storing or passing out project materials like fabric scraps, yarn, or beads. Place them on shelves or in cubbies to keep your art room tidy and accessible. I even keep the dirty plastic bins to use for plaster projects. Everything get used and re-used in an art room!

7. Bulk Up With Laundry Baskets
Laundry baskets can serve as bulk storage solutions in your art room. They’re great for holding oversized materials such as rolls of paper, cardboard scraps, or larger art projects. I primarily use them to hold smocks and tabletop easels.

8. Oversized Paper Storage
Storing and organizing large paper is such a pain! There’s the worry that it’ll get bent or torn. I’m a fan of this rolling cart. Some art catalogs also sell fixed drawers specifically designed for this.

9. Storage Hack: Paper Box Shelves
Now that you’re this far into your art room organization, you’re probably wondering, “What about storing wet 3D artworks?” It’s challenging having a small art room (or not art room at all) and attempting 3D art.
These paper box shelves are a great way to recycle something you might have laying around your school building into something functional.

When not in use, these boxes live in my closet. The closet is where I keep materials that are used infrequently such as batons of felt, plaster of paris, paper plates, and foil. And that’s because its location is in the hard-to-get, back corner of my small art room.

10. Plastic Bowls Are Great for Art Room Organization!
Everything in an art room has a second (and third) life. EVERYTHING. I bought these bowls when I was teaching summer art camp over 20 years ago. We were making paper mache bowls and I needed a mold. I continued to use them for this purpose.
But then I also realized they’re perfect for scrap art projects like artist trading cards. I just keep them stashed on my bookshelf or in my closet when I don’t need them.

11. Rolling Carts Are Your Friend
A rolling cart is a versatile and mobile storage solution for your art room. You can use it to store frequently used supplies, such as brushes and palettes. The cart can be easily moved around the room, allowing you to bring supplies to different workstations or store them away when not in use.
In my case, I use it right next to the sink as another shelf. As brushes and palettes get washed, they’re put back quickly.

I also have one for my document camera. And when I don’t need it, or when I need to get into the area behind it, it moves easily. I also store extra pencils, erasers, seating charts, and my teacher smock underneath. Seriously, I don’t waste any space!

12. Storing Art Posters
Art posters are both great teaching tools and quick classroom decor. But they’re a pain to store. To keep them organized and in good condition, consider the following tips:
- Poster Tubes: Roll up your art posters and store them in poster tubes to prevent damage. Label each tube with the content for easy identification.
- File Folders or Binders: If you have smaller art prints or posters, consider using file folders or binders with sheet protectors. This method allows you to flip through the pages easily and protects the prints from wear and tear.
- Vertical Storage Shelves: These hold drawing boards and large posters easily.

13. Free Space Is Not Just For Bingo
You can be super organized and get all your tools and materials in place. But when all is said and done, you need to leave some flux room. Because a day will come when you need to find an area in the room to set up an “art buffet” as I call it. I will often need to spread out materials for students to come help themselves.

I have a few of these available spots in my room on my bookshelf that spans one side of my room as well as on top of my rolling paper and supply storage carts.

14. Google Drive
In the digital age, utilizing technology for art room organization is a game-changer. Create a dedicated Google Drive folder to keep digital copies of lesson plans and materials, student artwork, and other important documents. This ensures easy access from any device and serves as a backup for your files.

Art Room Organization is the Key to Successful Art Teaching
Congratulations on embarking on your journey as a new art teacher! Setting up an art room is an important step towards creating a fun and inspiring space for your little artists. By implementing these 14 helpful art room organization ideas, you’ll be well-equipped to manage your supplies, projects, tools, and materials efficiently.
Remember, organizing your art room is an ongoing process. Stay open to experimenting with different systems and adjusting them based on your teaching style and the needs of your students. With time and experience, you’ll develop a well-oiled organizational system that supports student creativity.
Best of luck in your next adventure in teaching art!


This is such a helpful blog. I’m teaching art for the first time in 22 years. I’ve been a grade level teacher for the past 18. The Facebook group has been a life preserver. Thanks!!
Hi,
Do you tell students to draw the picture for craftsmanship on the back of the artwork?
Is that up all year?
Hey Jessica, if you’re referring to my craftsmanship bulletin board (https://glittermeetsglue.comproduct/craftsmanship-rubric/), no. I use that in some lower elementary lessons as a guide to what I’m looking for in a particular lesson. So, if it’s a lesson using markers, I’ve taught them how to use the broad tip to overlap strokes. They can then use the bulletin board to refer to for what would be considered good craftsmanship. They’re familiar with the emoji faces because I also use them in self-assessment rubrics that I collect from them (https://glittermeetsglue.comproduct/editable-art-rubric-for-elementary-middle-school/). TO be clear, though, I don’t use the craftsmanship bulletin board for all lessons. And that’s because some projects involving mark-making are intentionally “messy” or dramatic. Using the same example with markers, a student can draw a turbulent sky with very chaotic marks that some might perceive as “sloppy.” But in fact, they’re intentional and expressive. So it’s not a one-size-fits-all approach. Hope that’s clear.
How do you stop students from stealing your supplies?
Betty good question. The first thing you need to do is to label or mark everything with a number. Materials like Sharpies are easy. Those are snatched a lot by middle schoolers. You can either line them up in a row and spray paint with red paint across them. Or, you can make masking tape “flags” with numbers on them. I go the later route because I have students sign out materials on a chart and return them. THey’re doing this right in front of me, too. Another method is to fill a container with plaster of paris and as it dries, you push the caps of the Sharpies into it. Just the caps! When it dries, kids are only borrowing the marker, not the marker with a cap. So it’s less likely to be swiped. But that’s just one material. You’ll want to have random teachers coming to your room to borrow things also sign stuff out. Yep. Because they’re just as likely to swipe things. I keep a clipboard by the door and they just fill it out. Hope that helps!
I nearly forgot: I will also not release a class until all the materials are returned. In those instances, I’ve already stated at the start of the lesson, “I’m passing out X number of (whatever). I expect to receive X number of (whatever) back at the end of the period.” Then at the end of the period, I’m counting those materials being handed in out loud.
Love your ideas can you post some of your lesson plans they look really interesting.
Hey Carol, three of them are (https://glittermeetsglue.comproduct/peter-max-game/), Kerri Ambrosino boats (https://glittermeetsglue.comproduct/kerri-ambrosino-sailboats-game/), and Katherine Bernhardt (https://glittermeetsglue.comwp-admin/post.php?post=7442&action=edit). There’s one that’s based on my Keith Haring project. That particular year, I just decided to go off script and do something different. But it started out based on my Karing project (https://glittermeetsglue.comproduct/keith-haring-game/). Hope that helps!